
|
| Mod from Wikipedia, the section of a modern woofer speaker |
Be very careful when buying a vintage, antique or historic loudspeaker. After 40 or 50 years, the magnets suffer from demagnetisation and the neoprene suspensions are now a wooden ring, the plissé and impregnated silk has opened up in the folds, and the foam, now sticky like bitumen, will drive the repairer crazy.
And the worst is yet to come: oversized broken coils, oval or square suspensions that are impossible to find, cardboard cones with impossible angles. And there is no cure for everything.
Beautiful speakers, with captivating sound when new, but a proper restoration can cost much more than the car itself, as in the case of this Fiat 500B.
Defective or damaged loudspeakers have always been a mess for audiophiles. The main problems are reduced to 2, the first excess of power that burned one of the moving coil or one of the components of the crossover, the second being the age that deteriorated some parts, usually cone suspensions and capacitors.
It is also worth mentioning all that unconventional speaker series in which the milar is plagued, the magnets lose strength, the high voltage disappears. But there are special cases that can be resolved one by one, except for exceptions.
Speakers are usually almost 2 so you can compare the xover filter, the coil impedance and frequency response values and restore them. ALL THE SPEAKERS ARE REPAIRABLE ! Someone has built them so someone else can fix them. You have a Forcola of a gondola or a watch by Jean Leon Reutter or Arthur Beverly (perpetual charge), those that are problems!
A pair of ProAC Super Tablets with a locked woofer does not move anymore. The other woofer instead makes noise moving, there is some problem in the coils.
Dismantle the two woofers and see what happened.
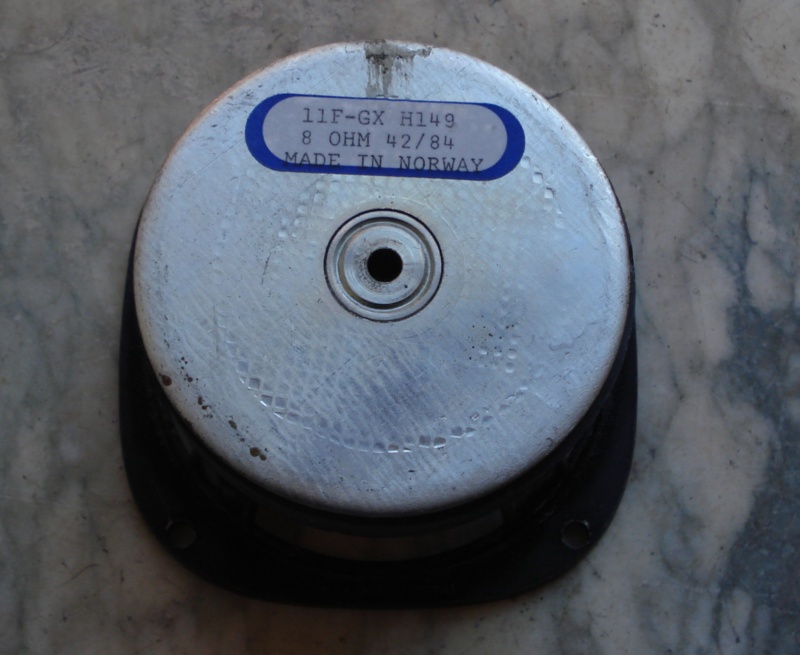 |
| from ProAC Super Tablet, the broken Seas 11F-GX H149, 8ohm. Open the image to see high resolution |
The woofer is very famous but is no longer produced, and almost all major brands use custom components, perhaps with the longest coil or with a different resonance. The modern version (1997?) Is the CA11RCY, here the specifications (.pdf 133KB).
Many speakers used this woofer, Keesonic Kub, Monitor Audio ONE Mini, Thiel CS3, Sonus Faber Minima and Sonus Faber Parva, practically all ProAC Tablet (s), and some Naim.
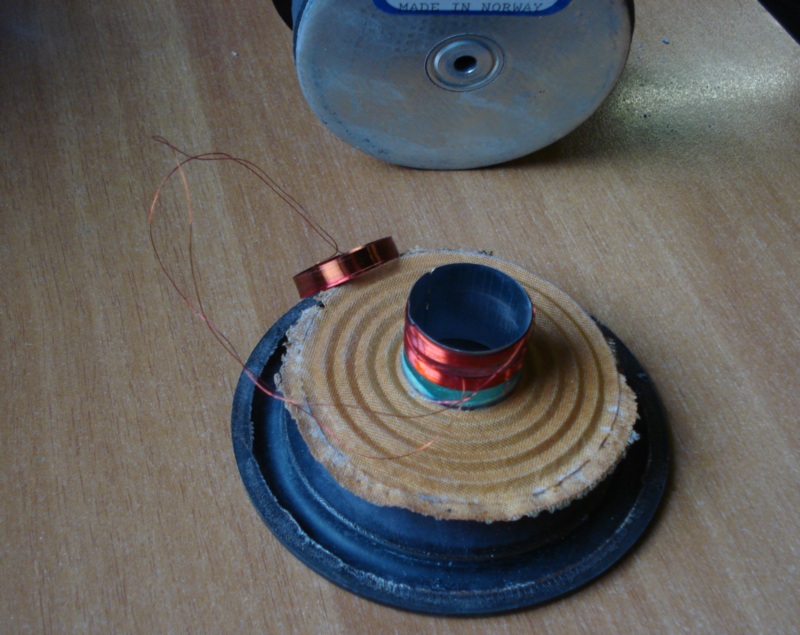 |
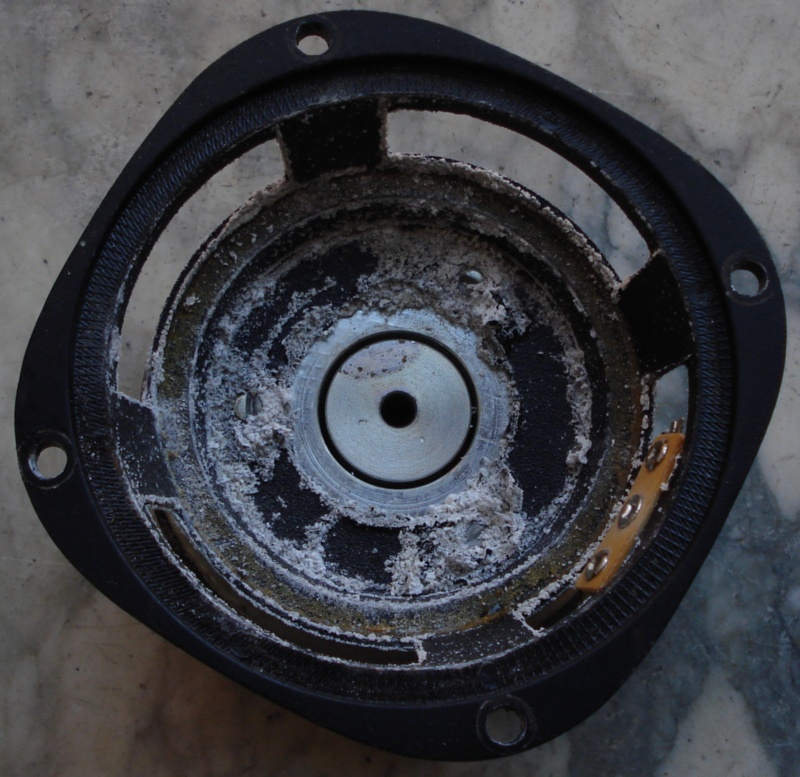
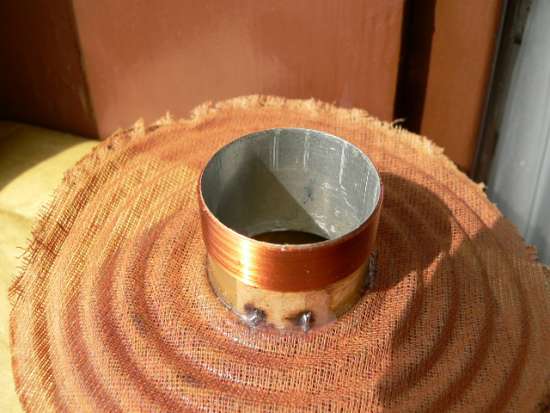
| the coil broken of Seas 11F-GX, strange no burn or melt |
What happened, you have to disassemble the whole cone and analyze it. The rubber suspension is good, still soft, without cracks, looks original, better to save it.
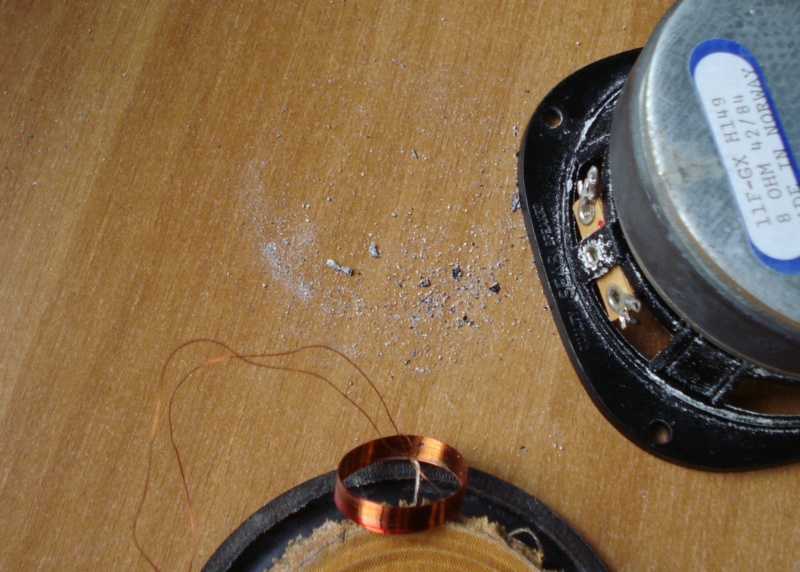 |
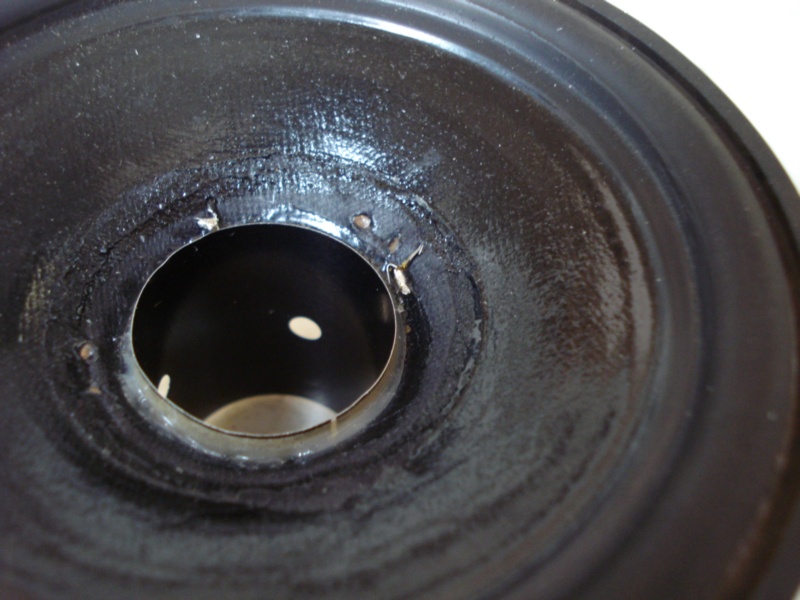
| some dust coming from the coil ?? |
Aluminium baskets are fully oxidized, never seen any damage even on some outdoor loudspeaker used on the beach.
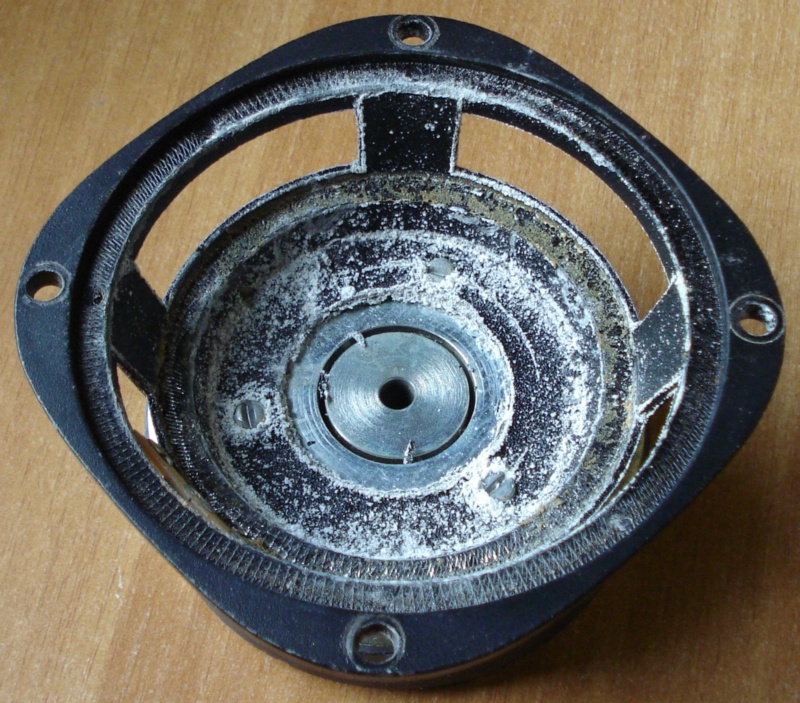  |
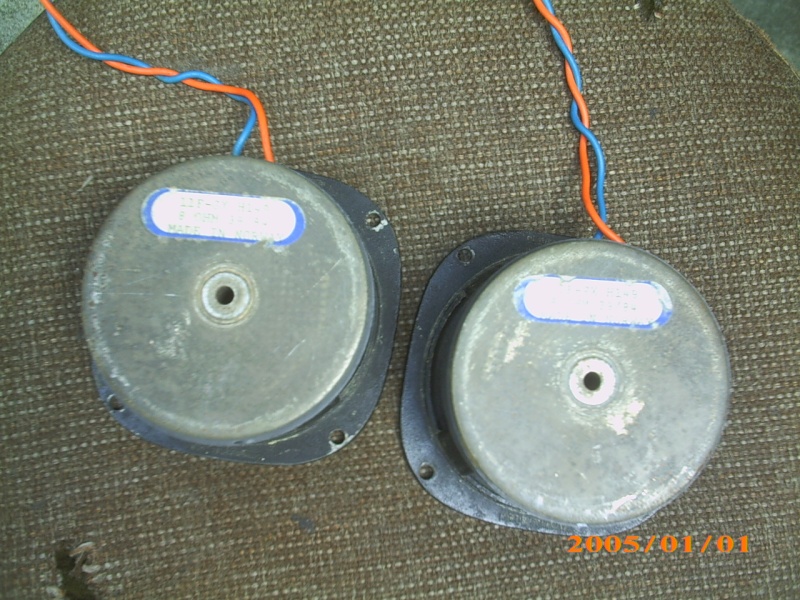
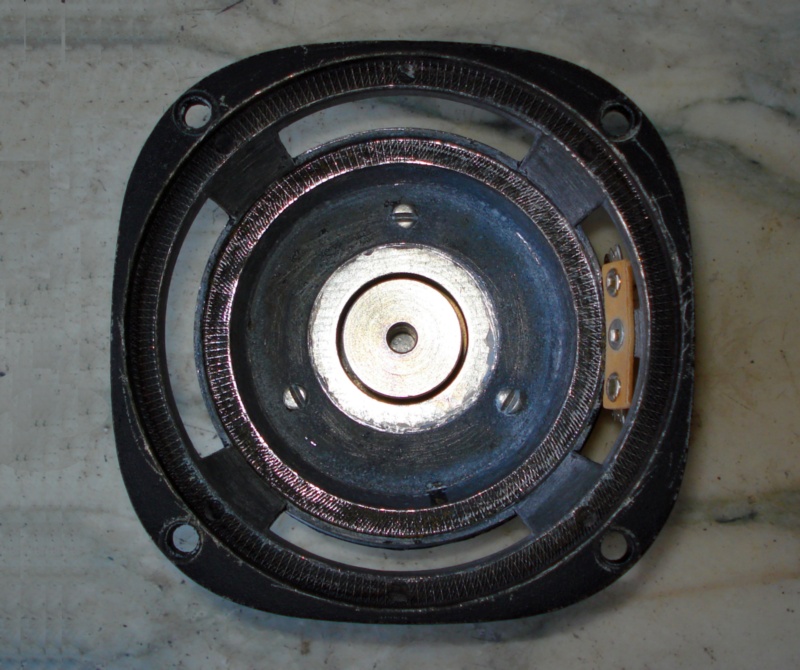
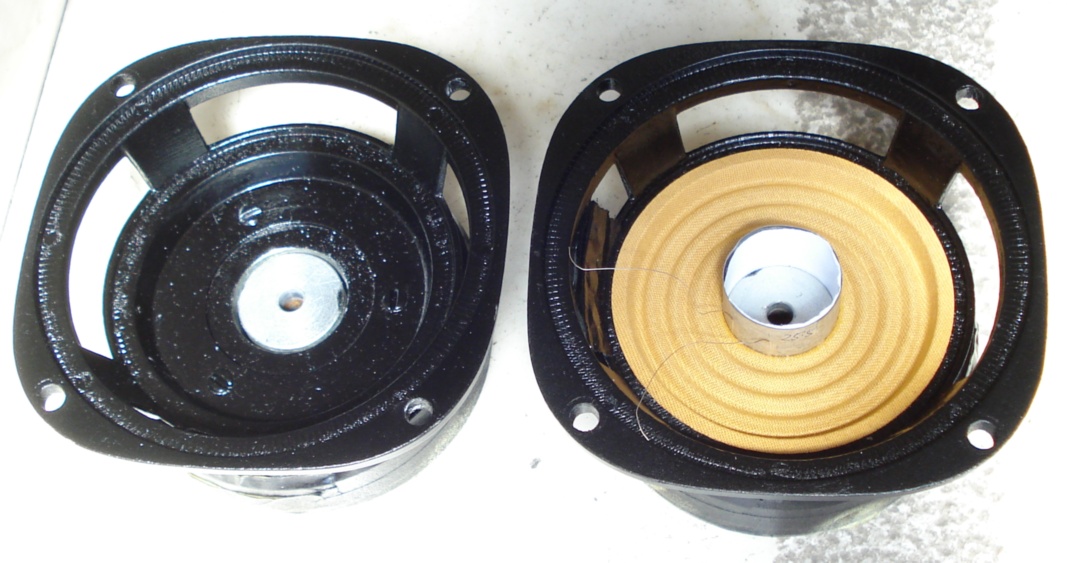
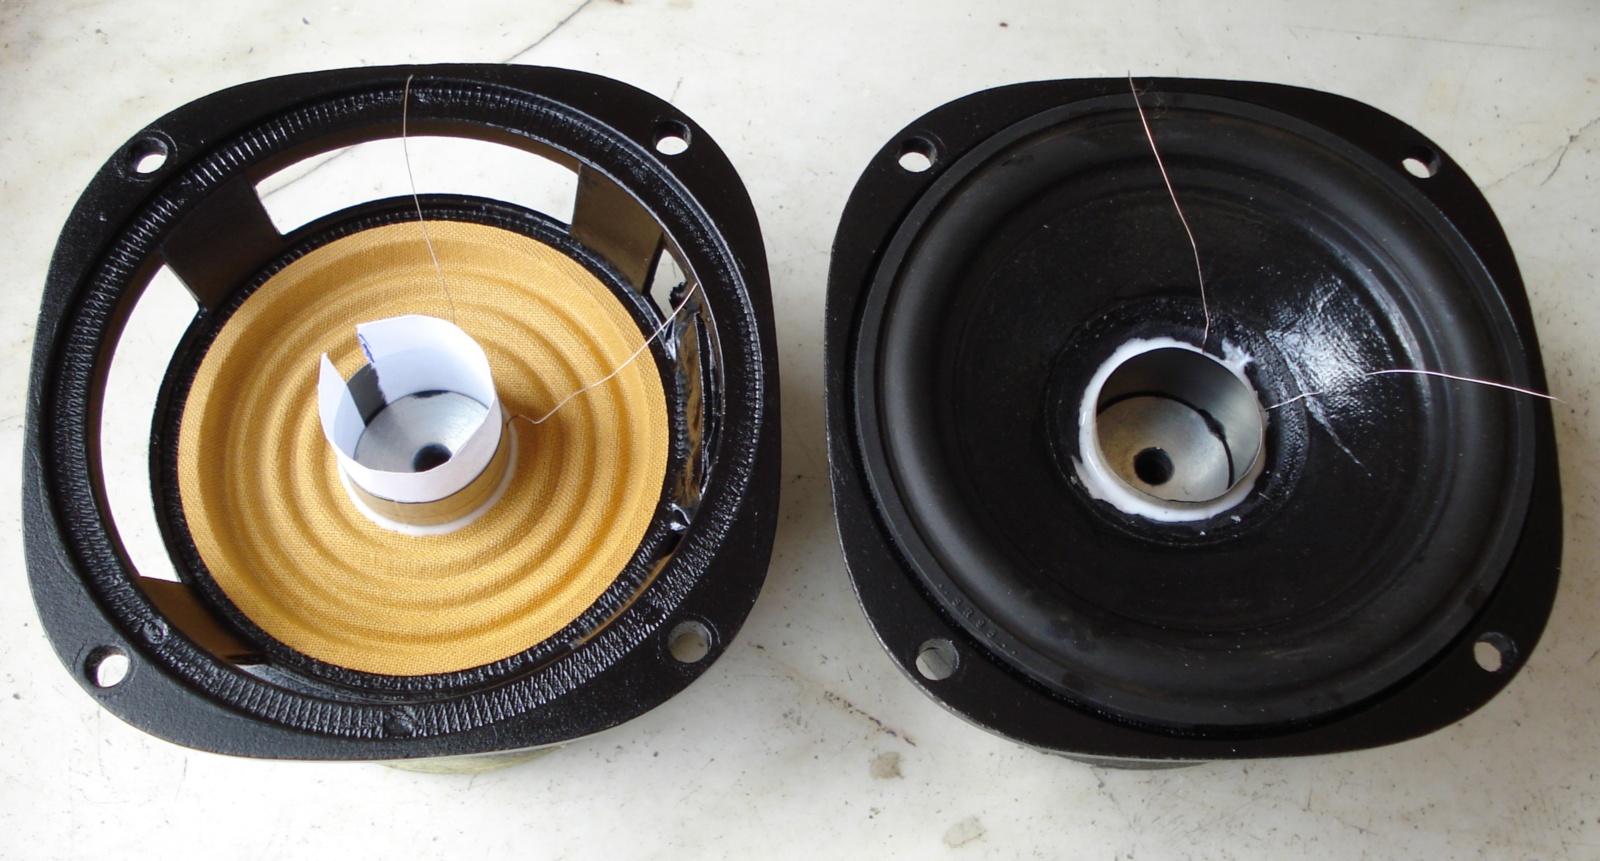
| the left and right H149 woofer, the frame oxidation fall in the coil space and block the movement |
Given the damage the repair does not seem easy, we try to see the costs of a pair of "new" woofers with some internet search.
 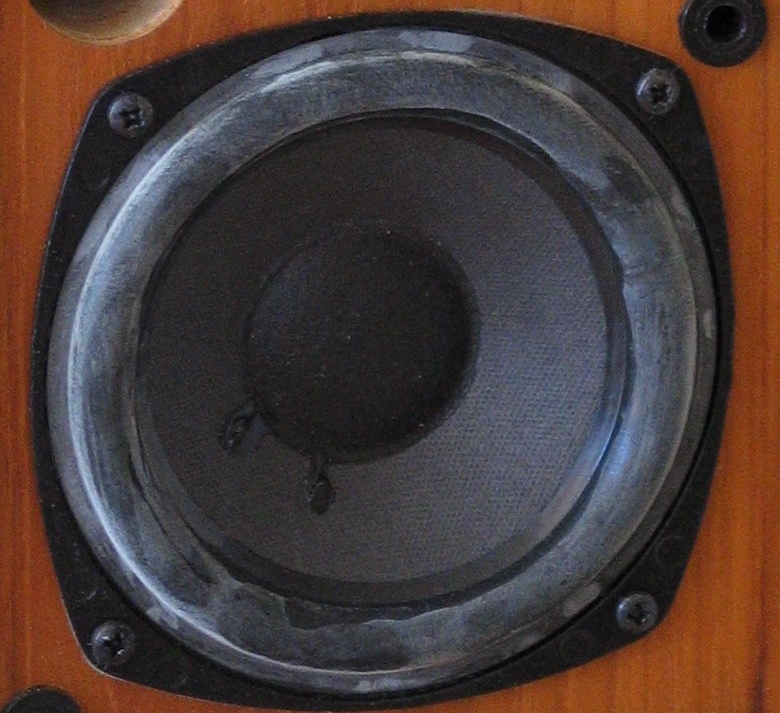 |
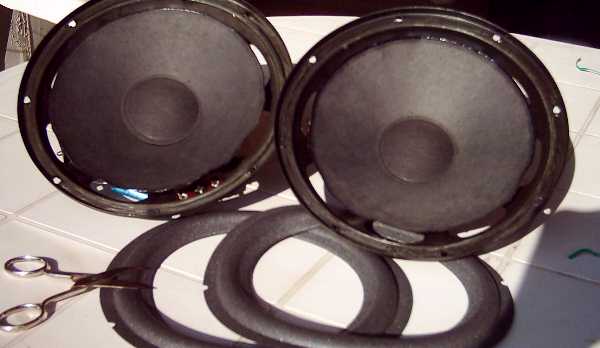
| 2 possible woofer sold in Internet, what you select for 50$ each? open the image to see large resolution |
All Hi Fi vintage does not deserve a repair, a patch, a piece, but it deserves a restoration, as if it were a 1800's bedside table.
Before restoration of a speaker we must cite the problem on "permanent" magnets, probably the magnets lose their magnetism over time (in 10 years we usually lost one per cents for commercial type) due to the effect of temperature, radiation, other magnets. Some speaker (and turntable cartridge) use special magnets better or worse. And I see an advertisement of a company able to restore large magnets (Curie's temperature) but I don't find more. An interesting study in the middle of this web page of Roger Russel (a myth for us).
 |
| Al frame after sandblasting, ready for painting |
One of the problems is to remove all the aluminium frame is oxidation. Given the shape it is difficult to use sandpaper or metal brushes, better sandblasting. But the sand would certainly fall in the gap and make us pen to remove it.
On the basket you have to eradicate the powders in the gap and fill with a cardboard ring (of the exact thickness) that comes out of a couple of mm, covering the centre with a grey sheet adhesive tape disk. It also covers the contacts of Bakelite stick.
We proceed with a micro-sandblasting (with silica sand) with one of those professional restoration tools, used for anchor, bronze, etc. But manualness does not invented in a day; it is time to asking an expert, Rita, my friend working in sector for 30 years.
As already mentioned, from the two woofers save only the cardboard cone and the rubber suspension. All the rest is used to search the internet, having carefully measured both the surviving coil and the inner and outer diameter of the gap, its depth, the diameter of the spider-side basket. Having the datasheet (vague as always) we compare the measures taken with these.
Here we would have an engraving on the tools to be used, aluminium rulers, brass scrapers or amagnetic stainless steel. All steel or sweet iron tools would magnetize (and if they are heavily magnetized they could damage the "permanent" magnet).
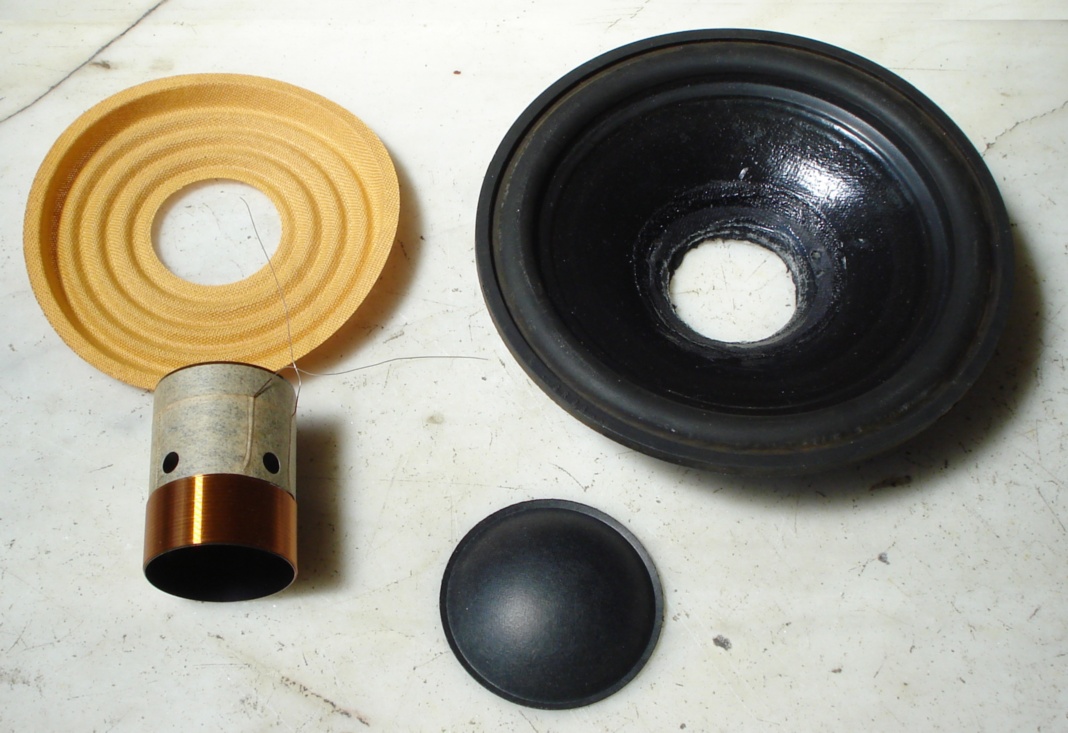 |
| new parts from an high quality supplier in China, the spider, the dust cap, the 8ohm, dual layer, coil around black aluminium, the original paper cone you can see double resolution of photo using right mouse button on the image |
Be careful with dimension and form; as example for the voice coil we can find 25.4, 25.5, 25.9mm of internal diameter, for the spider we find 25.5, 25.7, 30mm of internal diameter. The form also is very important, unfortunately in this case I do not find a spider as the previuos and I use a "trick" to mount the new one.
Having all the parts (about a month for the arrival) we begin the reconstruction, first we re-paint. Before you blow and clean the frame from the residual sand, even the idea of washing under a jet of water can be taken into consideration but be careful with drying, the sand blasted metal oxidizes very fast to air/water.
Next must be closed again the gap with a cardboard and covers the circle with adhesive tape, then give two hands of nitro paint, inside and out.
Dry the paint begins a fundamental job: clean up the gap, use adhesive tape, fly paper, compressed air, suction, vacuum, everything that cleans the magnet's throat is fine. But metal iron particles are difficult to remove because of the magnets' power.
 |
| on the left the frame with paint, on the right the new coil held by paper tube. The spider is in position ready to be glued on the coil side |
About the coil: the position of the coil within the magnet is important, there are a number of schools of thought about where to place the coil. Here we would at least have an original coil tied to the cone in good condition and from this you can take the measurements. Following some good documentation.
After positioning the coil and locking it with the cardboard it is time to fix it over the spider, Dry the glue passes to fix the cone, the last step is to glue the suspension. All just on coil side, but using frame as form.
 |
| on the left the fundamental step, glue on spider, on the right the step in next day glue on cone. Be careful on wires, see on the cone, are thin and frail |
The left picture is the starting point and the first source of error. The coil is secured with the cardboard and the spider positioned according to one of the rules seen before.
Every step must let the glue dry very well, that is, it starts again the next day, just like on the right picture.
 |
| after one other day it's time to solder the wires of coil with wire socking, buy if old one are fray |
In this case the surround is already mounted but should be glued after the welding of the cables and the glue of the holes in the passage. Always use the basket as a form and centre for mounting the surround on the cone.
 |
| the cone are ready to be installed on frame |
By doing all the steps slowly, leaving the glue dry, measuring and retrieving, you get to the photo above, a cone ready to be assembled.
After positioning the coil and locking it with the cardboard it is time to fix it over the spider, Dry the glue passes to fix the cone, the last step is to paste the suspension. All alone on the coil side, but using the frame as a form. As already seen in the picture above.
 |
| see the glue on the frame to fix the spider, ONLY |
Now is the time to fix the spider to the basket, as above. WARNING to position the coil's wires correctly in front of the contacts.
Using a suitable thickness cardboard, centre the coil and lower the cone until the spider is pressed against the glue. Let the glue dry for one day. DO NOT pull the cardboard until the end, this will be the final position of the cone, be careful.
 |
| the cone awaiting the drying of the glue, see the wires |
Below the picture of the moment when the suspension is pasted. First, pull on the cone to ensure that the suspension is positioned as in Figure 1.
 |
| a correct tools to fill the frame angle with glue |
If you just have to go wrong better the cone a little higher. One part of the suspension is lifted with a wood stick and a layer of glue spreads. If you have followed the instructions the rubber almost does not touch the glue.
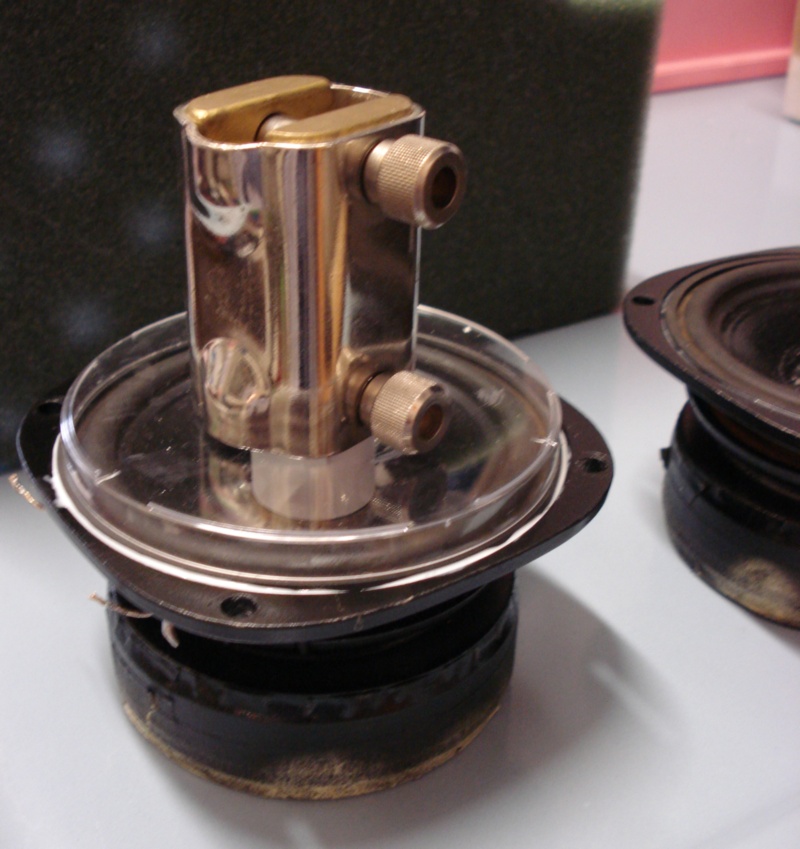 |
| with help of a transparent dish we push down only the ring of surround, with a little weight, see cardboard and wires |
Laying the glue across the circumference we need a disc, a ring, a bowl to press ONLY the edge, better a transparent thing (in photo at Petri dish laboratory). It needs a little weight!
If the amount of glue is correct it should come out a bit, as in the picture. The next day, dry the glue, it's time to weld the braids to the contacts.
We got to woofer mounting in the box. Before there are some tests to do:
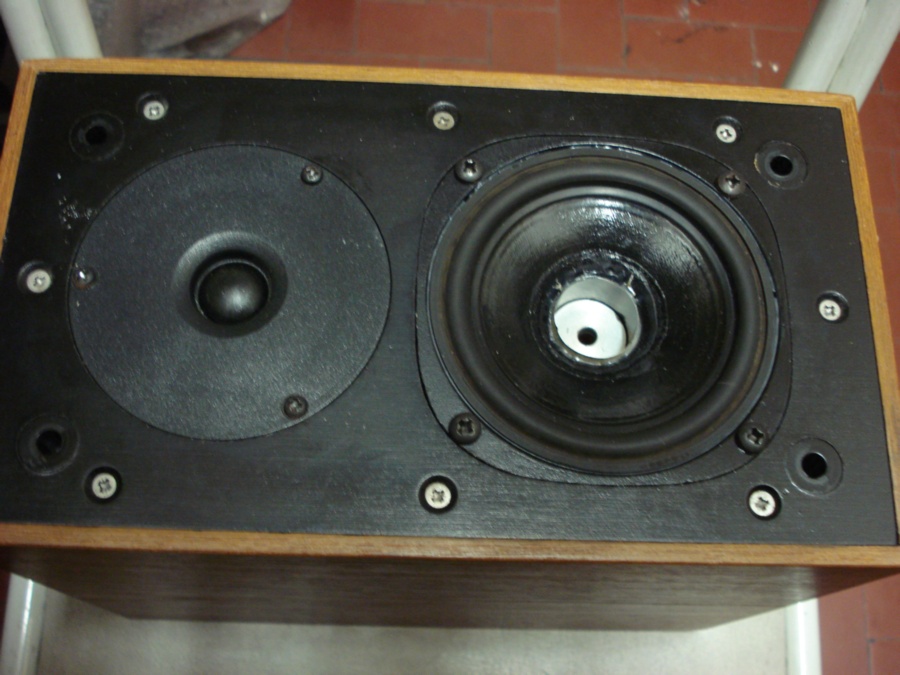 |
| fit in the box, without dust cap to be ready to dismantle again |
Now with the 2.83V, sinewave signal at about 800Hz, must be checked all the possible box positions, they are 6, and then listen to if the coil touches at a given location.
Having so many expensive instruments is a bit easier but just a good sound card and a software generator are sufficient, but we want an amplifier that smoothly pilots the 2ohm (at resonances, at crosses, etc.).
 |
| last, glue the dust cap and use a little weight to fix it |
If all is OK you can stick the dust cap, maybe using a torch as a weight.
Sound? Now a description is expected but I got the headache to write this page all in English. More 10,000 words with superlative invented at the time, no thanks.
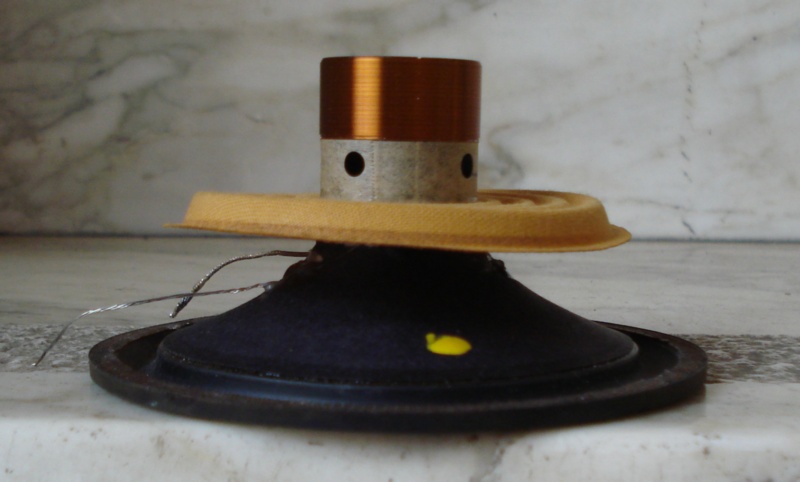
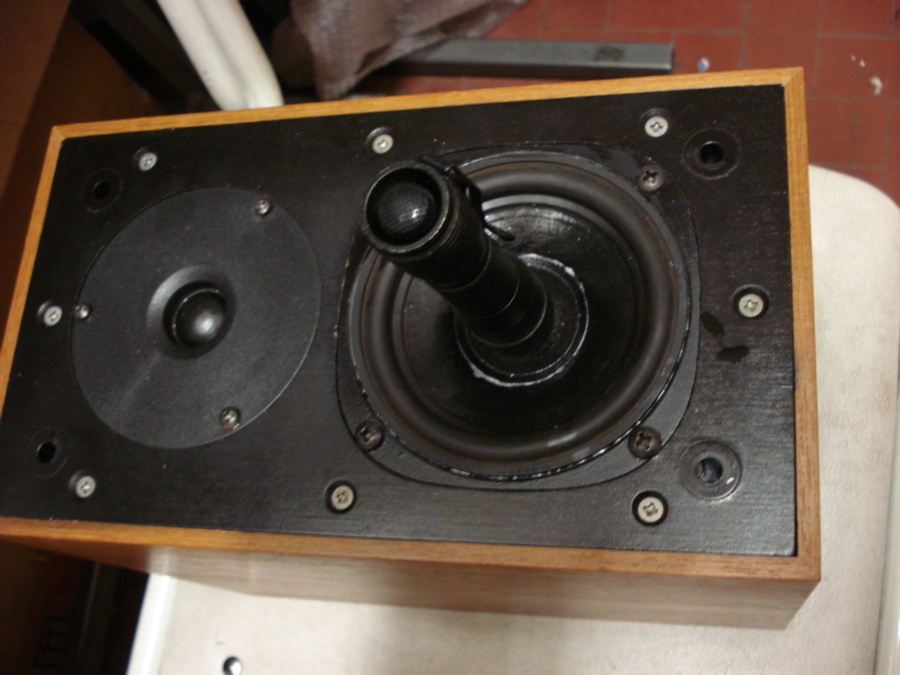
Quello mostrato e' un midrange con il foam ormai danneggiato. Si nota che il cono di cartone non e' piu' sostenuto e percio' se dovesse "suonare" in questo modo si danneggerebbe sicuramente la bobina e lo spider.

Se per caso il vostro componente e' in questa condizione la prima cosa da fare e' staccare la cassa dall'amplificatore, girarla in modo che il cono di cartone sia posto verso l'alto come in foto, cioe' con il peso che non grava sulla sospensione rotta.
Prima di parlare di ricostruzione bisogna controllare che il componente funzioni ancora. Messo in questa posizione, con un generatore di segnale, il robusto amplificatore detto prima e un buon orecchio si puo' scoprire se la bobina ed il centratore funzionano ancora bene. Segnale, meglio 0.5V o poco piu'.
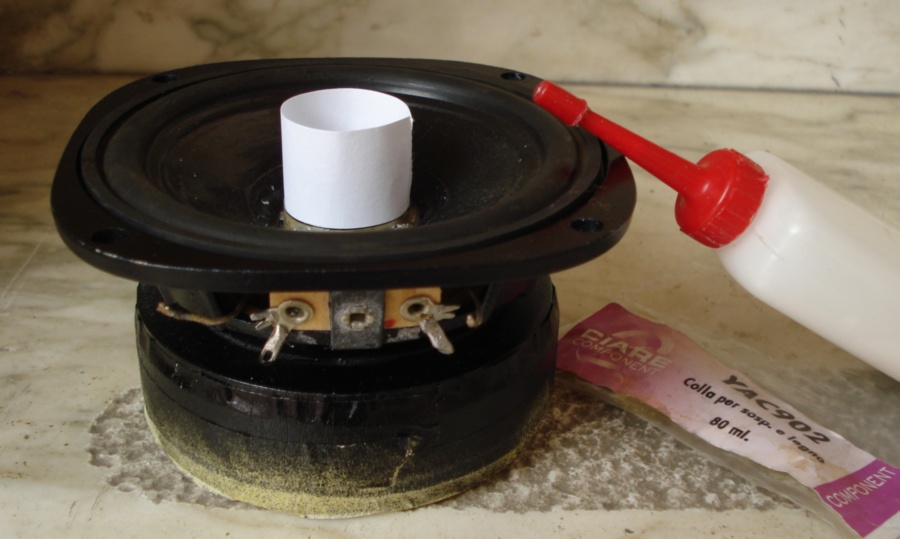
Ora bisogna trovare il foam nuovo. Il diametro del cartone, il diametro del cestello, la loro differenza, lo spessore del nuovo foam, la sua cedevolezza sono importanti. Non e' consigliabile tagliare ed incollare il nuovo foam meglio trovare la giusta misura. Purtroppo i vecchi woofer e tweeter hanno diametri spesso fuori standard.
Non mi dilungo su tutti i metodi di montaggio del nuovo foam, sul tipo di colla da utilizzare, sulla centratura e sulla successiva diagnostica, si trovano descrizioni su tante pagine di appassionati, su Internet. Di certo la manualita' e fondamentale e ogni gesto deve essere ponderato.
Se invece e' danneggiato il soffietto vicino al magnete, detto centratore/spider e/o anche la bobina e' rotta o storta allora si potrebbe smontare tutto il cono e sostituire le varie parti (vedi esempio Seas qui sopra). E' un lavoro davvero difficile, difficili anche da trovare i componenti, ma conviene sempre salvare un buona cestello ed un gran magnete. Contando sulle dita di una mano si trovano in italia degli artigiani in grado di far diventare un woofer/midrange di 20 anni fa' piu' bello che da nuovo.
MA, MA, c'e' un incognita. I magneti sono detti permanenti, ma anche il campo magnetico terrestre sta cambiando e la luna si sta allontanando. Per cui bisognerebbe trovare il modo di misurare il campo del magnete, o almeno se i due spekaer hanno ancora lo stesso campo. Come farlo? Difficile spiegarlo qui ma questo problema e' maggiore per i woofer, anzi piu' potenza sopportano e piu' il problema e' grosso (dopo 20 anni).
Le dimensioni del cono e/o della cupola sono cosi' piccole che e' difficile operare con questi componenti. Inoltre non sono facili da trovare i ricambi. Spesso poi per problemi di rigidita' e dissipazione termica i tweeter sono incollati praticamente in un unico pezzo.
Per alcuni tweeter di qualita' sono disponibili i kit di riparazione con tutta la parte mobile nuova (bobina, centratore, sospensione, ecc.), spesso non troppo difficili da montare. Questo pero' solo per componenti nuovi ed in produzione.
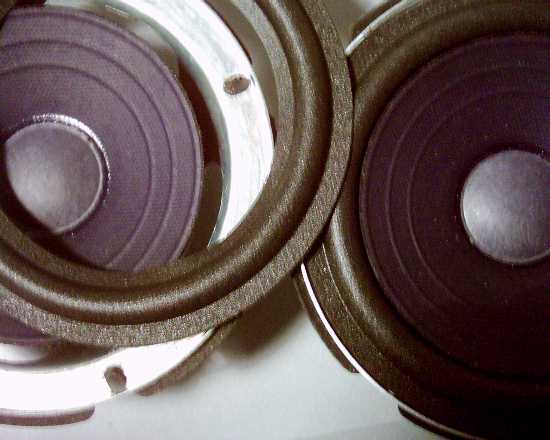
Il woofer sembra il componente piu' facile da ricostruire, e' grande, la sospensione e' larga, il cono e' spesso e robusto. Invece e' molto difficile, il woofer digerisce anche centinaia di watt, si muove moltissimo, se e' fuoricentro si brucia in un attimo, se e' disallineato distorce molto, se la colla non e' buona e ben messa si scolla dopo un giorno di duro lavoro.
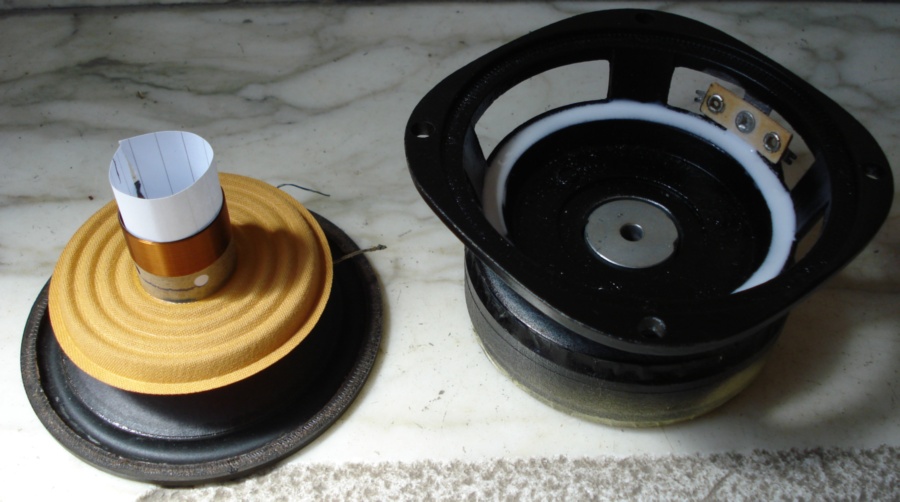
Guardando con attenzione la foto del woofer di sinistra, qui sotto, si nota il difetto di centratura che in piccola parte si puo' provare a risolvere con il nuovo foam senza toccare lo spider.
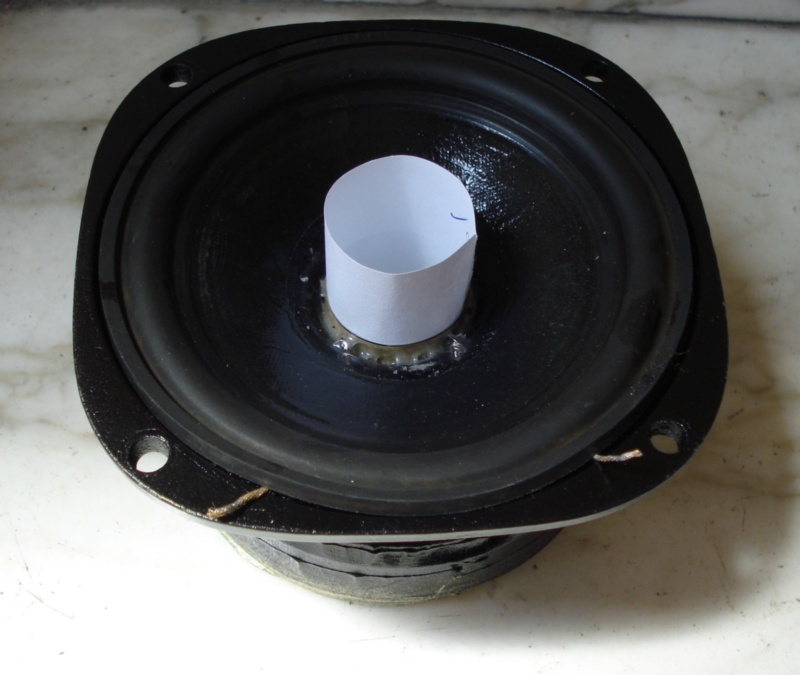
Ricordatevi di diffidare da chi non smonta il cupolino centrale, dust cap, e non provvede alla centratura della bobina prima di incollare spider e/o foam! Magari ne riparliamo per la nuova surrounding del Tannoy HPD 385 (dopo aver litigato su Fiber, Rubber, Foam, Paper).
Donations if you have a Bitcoin wallet
If you have a nice fat wallet you can send a few cents to this code 1ETv1mJTZTB7EiXwZkucF2BTA512Rkaw6 maybe with a message (be careful to the transaction cost, send 0.1 and pay 0.01 is not a good idea).
1ETv1mJTZTB7EiXwZkucF2BTA512Rkaw6 <== my code , Thank you.
Donations if you have not a Bitcoin wallet
If you like this work and measures you can make a small donation of Bitcoin. You do not need a wallet to make a donation, indeed even those who have Bitcoin wallet is better to pass for a web site that "gift" currency since this does not have a transaction cost.
To make a donation you must use some of your web-time on a Bitcoin Faucet, please go to Kickasstraffic.com, enter my code 1ETv1mJTZTB7EiXwZkucF2BTA512Rkaw6 into empty cell and press "Start Earning", a new sub-page appear, do not touch other then the last 2 buttons in lower right corner "Surf Ads" and "Active Window Ads".
If appear a tweet asking to register use the lower right corner button "Close", solve the Captcha and proceed. Of course any next page if different but I suggest you to stay more time possible reading pages and advertisement to produce Bitcoin (1/100000 I suppose) for me.
Be careful, do not use roulette, dices, casino and other stealing web site, as claim of supposed infection. We use Kaspersky Free Antivirus by 2 years without problems.
1ETv1mJTZTB7EiXwZkucF2BTA512Rkaw6 <== my code , Thank you.
| In the last years at Universita' Degli Studi di Roma La Sapienza |
Dr. G. Visco already contract professor for Chemistry in Environment & Cultural Heritage into --> |
Corso di Laurea in: Scienze Applicate ai Beni Culturali ed alla Diagnostica per la loro Conservazione |